


Once you get these earwires down, you will never want to use store bought earwires again! Seriously!
I have two types of earwires that I have purchased before this class. The first one has turned gold over time, with the silver color completely worn off. The second is mal shaped and likes to ooch out of the hole during the day. These handmade earwires are superior to any purchased from the store.
Now that I know how to make my own, I have ceased using the store bought ones for new jewelry (even though I still have a dozen of them on hand) and have slowly started replacing my old earwires.
These are seriously, easy peasy lemon squeezy!
Class Overview
First off, I learned how to make earwires through a class taught at Beadworld. The instructor, Christina, also taught the Wire 1 class I took early last year. This was a super easy class! It certainly lived up to its name: Easiest Earwires in the Universe! Even so, I highly recommend taking it as the instructor provides insight into metal working that only a trained metal smith can do.In this tutorial I will cover four types of earwires: the French hook, C-shaped and V-shaped earwires as well as the basic hoop earring. Part 1 will include a review of tools, materials and a tutorial for the French hook, which is the most popular earwire for dangly earrings. In Part 2, the C-shaped earwire (aka French Hoop), V-shaped earwire and the basic hoop earring will be covered. In addition, some inspirational projects and resources will also be reviewed.
Required Techniques
- Wire 1: Basic Loop - required for a basic understanding of wire working, work hardening, basic wire tools (pliers, wire cutters), eye fatigue, etc. Please give it a read before attempting to make your own earwires.
Tools
Besides the needle nose, chain nose and side cutters reviewed in the Wire 1 class, the following tools are used for making these earwires. | Chasing Hammer - ball-peen on one side and a larger domed shape on the other side. The side we will be using is the domed shaped side. The ball side is used for creating a texture on metal, while the domed shaped side is used to flatten and harden the wire. The domed shaped side is sometimes flat. A flat head can be used, however the domed shape makes it easier to not create marks on the wire from the edge. (image courtesy of fusionbeads.com) |
 | Mallet - comes in raw-hide, nylon or plastic. This tool is used to harden the wire without flattening it. The raw hide mallet is recommended over the plastic mallet. (image courtesy of fusionbeads.com) |
 | Double sided Mallet/Hammer - A double-sided mallet with one side plastic and one side brass. The brass side could replace the chasing hammer, however, the domed shaped head of the chasing hammer is preferred. The heads on this tool are interchangeable, which is great for not only having many options but also gives you the ability to replace worn heads. (image courtesy of fusionbeads.com) |
 | Bench block - you will need a metal bench block and a rubber bench block for this tutorial. The metal bench block sits on the rubber block so that the rubber block can absorb the shock of the hammering. This makes it a little less loud and prevents vibrations from shaking other stuff off the table. Hammering on the rubber is useful when you are creating patterns on metal and don't want the patterns to get flattened on the side facing down. (image courtesy of fusionbeads.com) |
 | Pencil or pencil sized mandrel - you can use mandrels of all sizes. Mandrels can be anything! A round pencil makes one of the best earwire mandrels. You can also use a sharpy or a tubular block of wood or something from your bathroom or kitchen! I have even used a prescription bottle and makeup tube. All it needs is to be round. (image courtesy of custompencils.net) |
 | Cup burr or metal file - the cup burr is a small cup with a file inside. It is specifically used for filing the ends of wire to remove the sharp poky metals that are created from cutting the wire. A metal file or sandpaper can also work. Use a brass wire brush to clean the file. The instructor made the comment that this tool lasts "forever."It is a misnomer that the cut wire is sharp because it is a point. It is actually sharp because the edge is rough with all kinds of small shards poking out. Some people think they are allergic to metal, but in reality they put on earwires that have not been properly filed down. These small metal shards cut up their holes causing a bacterial infection which in turn makes their earlobe red and puffy. (image courtesy of fusionbeads.com) |
 | Another good tool to have for this exercise is a pair of earplugs. We don't pound on the metal hard with the hammer, but the soft tink-tinking can cause permanent hearing damage after prolong use. Whenever you are doing something that has a prolonged high pitch or loud noise, it is good to wear earplugs to protect your hearing. The earplugs to the left are my favorite earplugs. They are made by Etymotic Research, which is a leader in ear bud technology as well as earplugs. Instead of blocking sound with a foam medium, this earplug provides a small tube which simulates how sound travels through the ear canal. It provides a more natural sound, but with reduced volume. These earplugs are typically used by musicians and concert enthusiasts to prevent hearing damage without distorting the music. I find them helpful for tuning down background noise at noisy restaurants so that I can still maintain a conversation with my fellow diners. Foam earplugs are probably better at toning out the higher frequencies; however, these earplugs are comfortable to wear all day, thus making them more likely to be worn. They are also relatively inexpensive, unlike Etymotic's ear buds. |
Materials
 | 20 gauge, half hard, German jewelry wire - 20 gauge wire works for most ear types. As people age, their earlobes get thinner. An older woman may find that 22 gauge wire is more comfortable. Younger women may find wearing 18 gauge wires are fine. Currently, women are getting their ears pierced with a larger gauge hole, which makes wearing a larger gauge earwire acceptable. The wire should be half-hard. Read the Wire 1 tutorial to learn about work hardening.Don't go for the cheap wire sold on a small spool. Get the wire that is in a loose loop. I find the wires on the spool are too soft and sometimes have a film on them that comes off after shaping it. German jewelry wire is a high quality wire that will retain its shape while working with it. I love the wire from Beadworld because I know that it will be a high quality wire. (image courtesy of fusionbeads.com) |
Basic French Hook Earwire
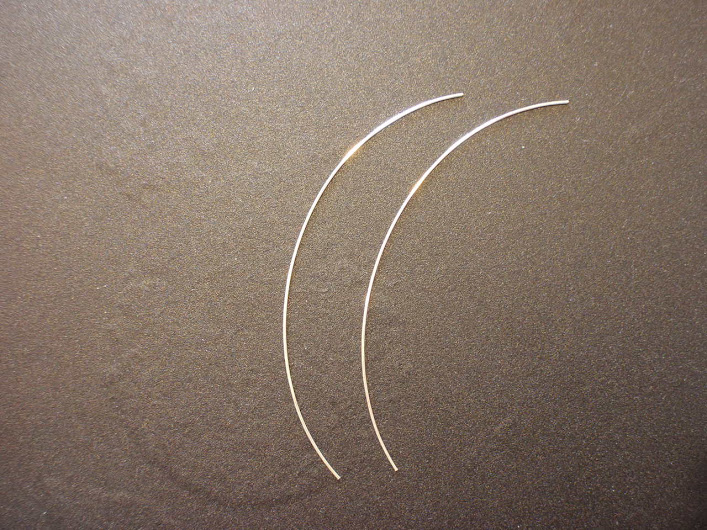 Cut two even lengths of wire. Tip: To cut the wire the same length, line up the first piece with the second and cut through the end of both the first and the second. Cut two even lengths of wire. Tip: To cut the wire the same length, line up the first piece with the second and cut through the end of both the first and the second. |  Make a P or a lollipop eyepin. You can make the eyepin the way we did in the Wire 1 - Basic Loop tutorial or you can start at the end of the wire with your needle-nose pliers and bend the wire around them, rotating the needle-nose as you go. Make a P or a lollipop eyepin. You can make the eyepin the way we did in the Wire 1 - Basic Loop tutorial or you can start at the end of the wire with your needle-nose pliers and bend the wire around them, rotating the needle-nose as you go. |
 The instructor had us make P eyepins, but I prefer the lollipop eyepin. Use your chain-nose pliers to rotate the P to make an O eye. Make two matching pairs. The instructor had us make P eyepins, but I prefer the lollipop eyepin. Use your chain-nose pliers to rotate the P to make an O eye. Make two matching pairs. | 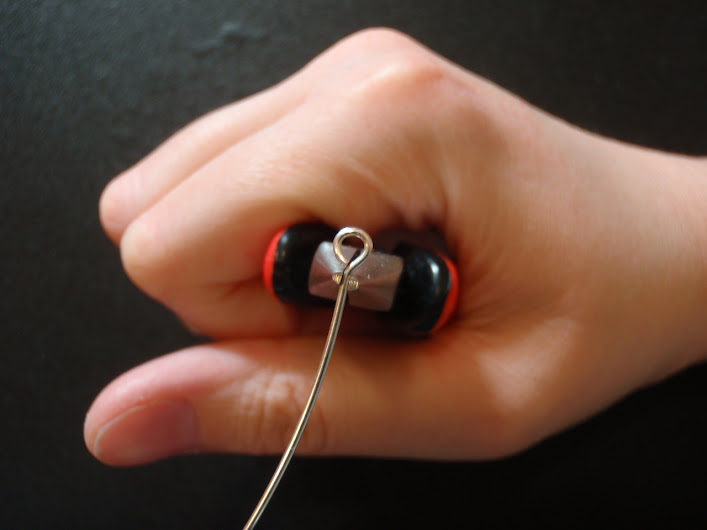 With your chain-nose pliers, grip the eyepin with your pliers above the eye. Bend the wire slightly. With your chain-nose pliers, grip the eyepin with your pliers above the eye. Bend the wire slightly. |
 Evenly place the two eyepins over a round pencil sized mandrel (or just a round pencil). We are going to bend the wire in the opposite direction of how we bent the wire in the previous step. The wires should be placed on top of the pencil with the eyes even with each other. Evenly place the two eyepins over a round pencil sized mandrel (or just a round pencil). We are going to bend the wire in the opposite direction of how we bent the wire in the previous step. The wires should be placed on top of the pencil with the eyes even with each other. |  Bend the tail with thumb and finger around the pencil mandrel creating a graceful curve. The tail end of the eyepin should be parallel to the stem. If you do this slow and methodically, you will be more likely to not make them evenly shaped. This should be a quick motion. Bend the tail with thumb and finger around the pencil mandrel creating a graceful curve. The tail end of the eyepin should be parallel to the stem. If you do this slow and methodically, you will be more likely to not make them evenly shaped. This should be a quick motion. |
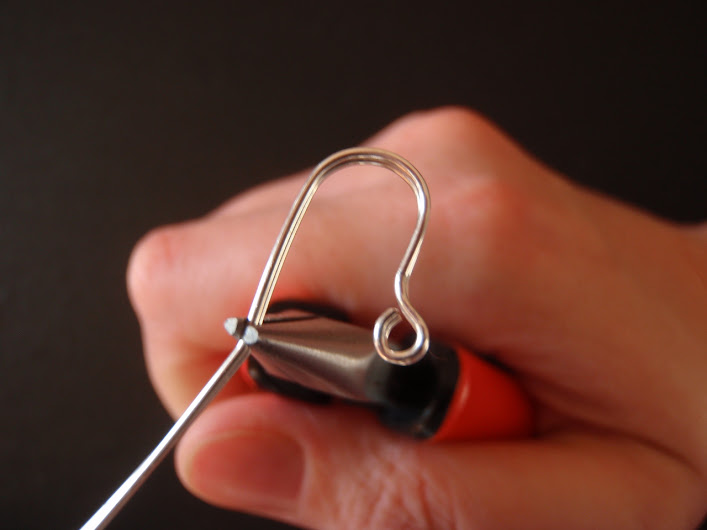 Remove from the mandrel. Grip the end of the hooks with your chain-nose pliers and bend the ends slightly. Remove from the mandrel. Grip the end of the hooks with your chain-nose pliers and bend the ends slightly. |  Cut off excess wire from the tail. Cut the earwires at the same time to ensure they are the same length. You want the flush side of your cutters towards your hook so that you get a flush cut. Cut off excess wire from the tail. Cut the earwires at the same time to ensure they are the same length. You want the flush side of your cutters towards your hook so that you get a flush cut. |
 Use the cup burr or a metal file to file down the tip of the earwire. This will take some "muscle" and should make the tip feel smooth and not prickly. Use the cup burr or a metal file to file down the tip of the earwire. This will take some "muscle" and should make the tip feel smooth and not prickly. | 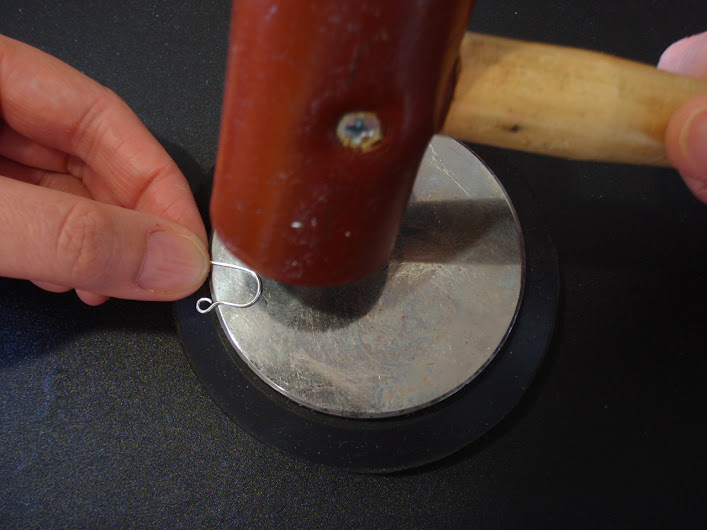 Place the earwire one at a time on the bench block. Gently tap the wire with your hammer or mallet. Using the hammer will flatten the metal. You should only flatten the metal on the two sides. Never hammer the eye. This is because you may want to open the eye and you don't want it to get too hard and have metal fatigue. You also do not want to flatten the tip that you poke through your ear or the hook part that sits on your ear. Place the earwire one at a time on the bench block. Gently tap the wire with your hammer or mallet. Using the hammer will flatten the metal. You should only flatten the metal on the two sides. Never hammer the eye. This is because you may want to open the eye and you don't want it to get too hard and have metal fatigue. You also do not want to flatten the tip that you poke through your ear or the hook part that sits on your ear. |
 When the metal has become hard, it is stiff and no longer springy. Place the earwires back onto the pencil mandrel and ensure that they are still evenly shaped. After hammering them, they can loose their shape slightly. When the metal has become hard, it is stiff and no longer springy. Place the earwires back onto the pencil mandrel and ensure that they are still evenly shaped. After hammering them, they can loose their shape slightly. |  Admire your new earwires! (and ignore how dry my skin is!) Admire your new earwires! (and ignore how dry my skin is!) |
Note that in the majority of these steps you want to work with the earwires at the same time. This ensures that they will match. What ever you do, you do NOT want to try straightening wire and reworking it. This will cause the metal to fatigue. It may not break at first, but eventually will. Read the Wire 1 tutorial for more information about work hardening and metal fatigue.
And you are done! Your first earwire is complete. Easy, right?
If you have any questions, please feel free to leave them in the comments.
Up Next
In Easy Peasy Earwires (Part 2) we will cover the C-shaped earwire (aka French Hoop), V-shaped earwire and the basic hoop earring. We'll also take a look at some inspirational designs and additional resources for making your own earwires.Linking to: Pin Me | Saturday Night Special | A Pinteresting Party | Make the Scene Monday | Creatively Tuesday | The Fun in Functional | Show & Share Wednesday | Live Laugh {Linky} | Empty Your Archive
What a fantastic tutorial! I admit when I make jewelry I use the store bought sterling silver earwires, but I might just try to make my own from now on. Pinning this! :-)
ReplyDeleteThank you! They are seriously superior to the ones you can buy. Once you get them down, you'll never want to buy earwires again. :)
ReplyDeleteInteresting to know. I've never made earrings!
ReplyDeleteIt's fun! I love it when people comment on my jewelry and then I get to say, "I made them myself." But then, isn't that what all us crafters love?
ReplyDelete[...] I took a class to learn how to make earwires, I started thinking about what else I could make with wire and different sized mandrels. I have [...]
ReplyDelete[...] Easy Peasy Earwires - more techniques and tools used to shape wire and harden it [...]
ReplyDelete[...] necklace chain. I then made a hook by wrapping it around a pencil mandrel in a similar manner to my Easy Peasy Earwires. I attached a garnet swarovski crystal bead to the heart closure end so it will match my heart [...]
ReplyDeleteThis is so cool! I love tips that save me money on my crafting!
ReplyDeleteadidas yeezy
ReplyDeletenike huarache
calvin klein underwear
adidas nmd
ultra boost 3.0
tory burch shoes
nike cortez
vanvan cleef and arpels
supreme clothing
vans shoes