

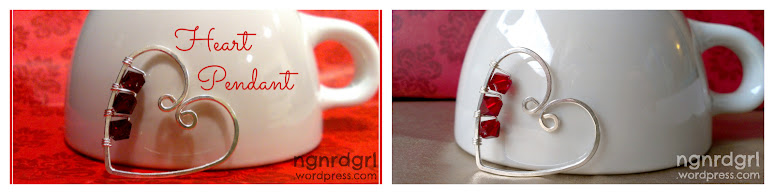
+(1).JPG "DIY Light Box by Bethany the ngnrdgrl")
One of the biggest photography tips out there is to use natural lighting. Well, let me tell you. Natural lighting can be pretty fickle in Seattle. Paint companies have even named their gray paint after us: Seattle Gray.
Let me give you an example of how natural lighting can really enhance your photos:
 |
| Benefits of Natural Lighting: Both taken with my HTC One S Camera Phone. Left: Fluorescent Lighting at Night. Right: Natural Lighting during the Day |
The first picture was taken with my camera phone under fluorescent lighting. I thought I could fix some of the blandness in a photo editing program. Later that week, I took a picture of my pendant near a window to take advantage of some natural lighting. What a world of a difference!!!
I am appalled to have published that first picture! It is horrible! What was I thinking? Oh, yeah. I was thinking, "dang, it's winter in Seattle. I'll have to make do with a picture under my fluorescent lighting and try to correct it later."
Yeah. As you can see from the pictures, natural lighting beats fluorescent lighting for sure.
Being that I live in Seattle, though, I decided I can't rely on natural lighting alone. I want to be able to take quality pictures of my jewelry and crafts without relying on what time of day it is or whether I can capture soft light through my window or not. After doing some research (on Pinterest!), I decided to jump on the light box band wagon.
A ton of people have made their own light boxes well before me, so this isn't anything new. However, the majority seem to be made with cardboard boxes. I found a couple of alternatives to the cardboard box and decided to make mine similar to nataliezdrieu's DIY Light Box.
Supplies and Cost Breakdown
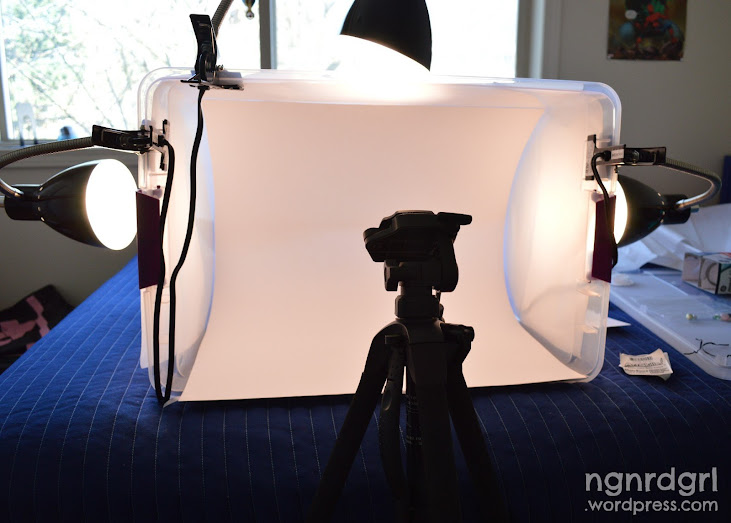
To make your own light box, you will need to following materials:- 1 x Clear Storage Container (66 Qt)
- 3 x Lamps
- 1 x Package of Four Full Spectrum Bulbs
- 1 x White Poster Board (22 in x 28 in)
- 1 x package of Solid White Gift Wrapping Tissue Paper
- 1 x Surge Protector or Three Outlet Extension Cord
|
|


 |
| GE Reveal 60 Watt Bulb 4-pk. = $9.99 |
I chose a large (66-Qt) storage container that is clear and squarish (no rounded sides). It cost me $9. You could also make a frame out of cardboard or foam board, but I like the idea of the dual usability of a storage box.
The most expensive part of the set up is the lamps. If you have lamps available at home, use them. I didn't, so I bought three clip on desk lamps for $10 each. I also bought full spectrum, 4 pack of bulbs, which was also around $10.
The total set up cost me under $50. I already had the surge protector, which was an afterthought when I realized I needed extra outlets for the three lamps.
Light Box Set Up
This is the best part. My first time setting up took me less than 10 minutes!Here is how to set up your own Light Box:
- Remove the sticker label from your container and remove the lid. Lay the container on its side.
- Cut the poster board width down so that it will fit inside of your container. I had to cut roughly 2 inches off the side. Stick your poster board inside and tape into place.
- Drape a single layer of tissue paper on the top and sides. I didn't even need to tape them down because of static cling!
- Remove your lamps from the packaging and install your full spectrum bulbs.
- Clip one lamp to each side and clip the third lamp to the top. Point all the lamps toward the box.
- Plug all the lamps into a surge protector and turn them on!
Presto! Light box acquired!
I chose to use a storage container over making a cardboard or foam board light box (several examples of which are pinned to my Photography Tips Pinterest Board), because once I am done taking pictures I can store all the supplies inside of the storage container. If it was made out of cardboard, I would have to figure out some place to put it where it wont' get crushed. I don't have to worry about storing the storage container because of its dual function. Also, the additional cost for the storage container was only $9.
Example Pictures
Remember my Pinspired Paper Flowers? Here are some side by side pictures before and after the light box: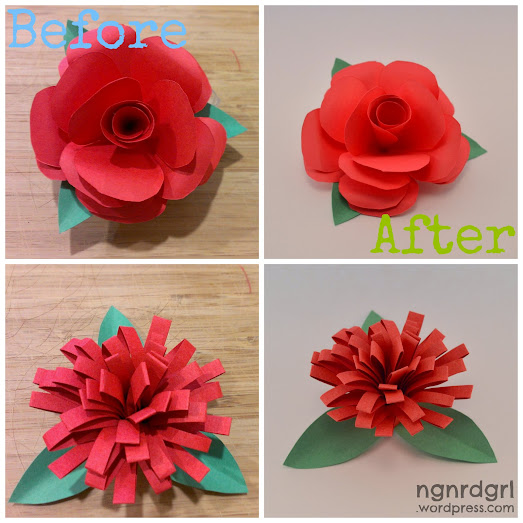 |
| Pinspired Paper Flowers: Pictures on the left taken with an HTC One S Camera Phone under fluorescent lighting during a cloudy day. Pictures on the right taken with Nikon D3200 in light box during a cloudy day. |
Here is another example, using my Faux Antique Crystal Chandelier Earrings. First the before shot, which was my original "attention grabber" picture:

I took this picture with my HTC One S Camera Phone in the bathroom at work. Haha!
Now here are my unedited pictures from the light box:

After making the above collage, I decided to try lightening it all up:

What do you think of my light box pictures? Are you considering making your own light box?
Alternatives to the Light Box
Instead of making a light box, here are some ways to capture your natural lighting better: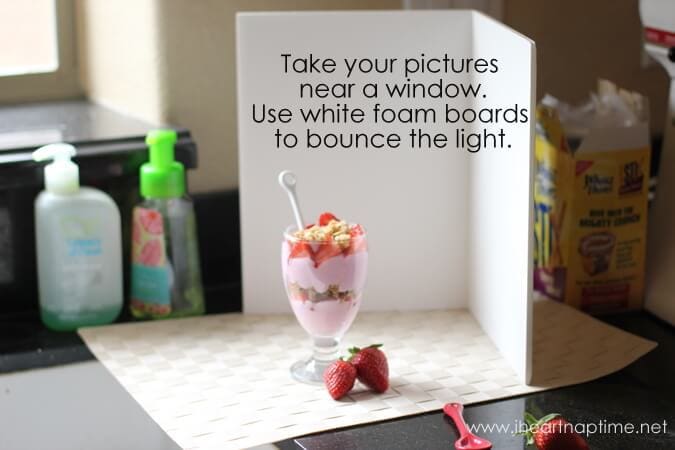 |
| White Foam Boards - Not only a great backdrop, but they bounce back the light from your windows. (image courtesy of I Heart Nap Time) |
 |
| Roller Shade and Foam Board for instant photography studio (image courtesy of In My Own Style) |
 |
| Here are two ideas in one: 1) Use Tin Foil as reflectors - can be used in combination with foam board. 2) Tape tissue paper to a window for either a background or diffused lighting (image courtesy of Handmadeology) |
So what do you think? Are you planning on setting up your own Light Box or Natural Lighting Photography set up? Have you made your own Photography Set Up?
We would love it if you share your work with us at Photog Show and Tell! It is a monthly photography link party designed to promote practicing our photography skills and sharing tips and tricks with each other. Hope to see you there!
Featured on: Sharing with Domestic Superhero
Linking To: Give Me the Goods Monday | Show & Share Wednesday | Sharing with Domestic Superhero | Talking About Thursday | What to do Weekends | Pin Me | Freedom Friday | Creatively Tuesday
Great ideas!!! Thanks so much for the informative photography ideas. I have the hardest time finding good lighting and its gray here, but not Seattle gray so I dont even have a good excuse. Def looking into these.
ReplyDeleteWe have the "gray" problem here in Pittsburgh, too. Blah. I made one of the cardboard light boxes, and it has definitely helped, but you're right-- storage is a pain. Our new DSLR came in this week, and I am totally dying over it. Even with having no clue what I'm doing yet, the pictures are 1000% better than my point and shoot. Keep posting all of your photography tips...I'm going to need them!! ;) Happy Monday!
ReplyDelete~Abby =)
What an awesome post and DIY is the way to go because so much photography equipment is outrageously expensive.. Bookmarked this page.. Thank you!!
ReplyDeleteAwesome Beth! Great pictures :) Awesome tips, too!
ReplyDeleteThat's awesome! I am so glad you are enjoying your DSLR! Yeah, my point and shoot was pathetic. My camera phone actually took better pictures than it. I am really digging my DSLR. Happy Monday! (and haha, I responded to your previous post before seeing this one.) :)
ReplyDeleteYay! Thanks for checking it out! I am really excited to work more with it.
ReplyDeleteCapturing that light can be a challenge. I hope this helps!
ReplyDeleteYay! Thanks!
ReplyDeleteVery resourceful, the photos look so much better in natural light!
ReplyDeleteI've found great success with using white foam boards as a blank backdrop and to bounce the light. Our living room lets in a ton of light and since we're in the Sunshine State, it's the perfect recipe for blog photography. Still, there are many evenings when I'm up late at night, working on a project that I want to photograph and be done with, but instead, I have to wait until daylight comes. It's those moments that I wish I had a photo light box. Thanks for sharing your process! I'll definitely refer to this if and when I create my own.
ReplyDeleteOMG this is so cool!! Thanks so much for sharing! I live in Vancouver, Canada so I totally understand the lack of sun :( Thanks for linking up to Give Me The Goods link party! Can't wait to see what you link up next week ;)
ReplyDeleteJamie @ somuchbetterwithage.com
Then you totally understand my lighting conditions, neighbor! :)
ReplyDeleteThanks for checking it out! You are lucky with your "Sunshine State." Seattle is the suicide capitol of the country. I don't mind the gray weather, but it does suck for photography. I do want to try the foam board with natural lighting too. :)
ReplyDeleteYeah, natural lighting is the best. :)
ReplyDeleteThanks for the DIY. Pinning this to my photography board on Pinterest.
ReplyDeleteAwesome! I always struggle with light, esp if I can't take my food photos outside or if it's too late in the day!
ReplyDeleteAmanda
Great ideas! I am pinning this! Thanks for sharing at Domestic Superhero Sharing Thursdays!
ReplyDelete[...] The snow was quite shocking, since we did not have any snow all winter. It has since been typical Seattle gray, but today the sun decided to come out and [...]
ReplyDeleteGreat idea with the use of the plastic bin! What a big difference!
ReplyDeleteI love the plastic bin! I just cut up an 18" x 18" cardboard box and cut out 3 sides and covered the sides with white fabric. I'm really really happy with the way pictures come out. I hate having to wait until daylight to take pictures. I think it's going to work out great. Next time, PLASTIC BIN! Thanks, Linda
ReplyDeleteLove the idea of using a plastic container. I finally got around to putting my collapsible box up and taking pics of it but I just haven't had the time to post it.
ReplyDelete[...] we have a great tutorial from Bethany on how to make your own Light Box. This is super handy for bloggers or people who just want better pictures in [...]
ReplyDeleteThis was super popular at my link party last week, thanks so much for sharing it! I am featuring it today, so come on by and grab a featured button and link up with us again! http://domesticsuperhero.com/2013/04/04/sharing-with-domestic-superhero-thursday-5/
ReplyDeleteThank you so much! I am heading over there now!
ReplyDeleteWhat a wonderful idea to use a plastic storage bin! I love that it will hold all of the lights and supplies when you're not using them. I struggle with the Seattle gray, too - we get so few nice days for natural light, it really can be challenging. I've not taken the time to build a light box yet, but I know I need to. Your jewelry photos were beautiful!
ReplyDeleteThank you! It really was so simple to make. I really like the idea of using the bin to store all my supplies. Currently everything is still set up ready for pictures in the guest room, but when I have a guest, it will be so easy to take apart and stow it. Setting it back up will take less than 5 minutes. Definitely helps with the Seattle Gray weather. Although it seems like the sun is trying to come out today. Wasn't it supposed to be gray and raining all weekend? :D
ReplyDeleteI was going to do the cardboard box too. I saw someone else use the plastic bin and just thought that was genius. Since the most expensive part for me was the lighting, the plastic bin just made it easier and gives me a place to stow it all. Thanks for dropping by!
ReplyDeleteI checked out your collapsible box. Genius with the (non-brand) velcro straps. Before I found the idea of using a plastic storage bin, this was the route I was planning to take. Thanks for sharing it with us!
ReplyDeleteOops. Spoke too soon! It's back to Seattle gray and raining.
ReplyDeletePinned. What a great idea! Thanks for the awesome tips! And I'm an ngnrdgrl too! or at least was... :) Stopping by from craftsalamode's linky.
ReplyDeleteUsing the white foam box is a cool idea.
ReplyDeleteIt will be very interesting for the people who will attend. It is also useful especially about social media, people can get information because of this. Thanks for sharing. Great Portfolio Themes
ReplyDeleteadidas yeezy
ReplyDeletenike huarache
calvin klein underwear
adidas nmd
ultra boost 3.0
tory burch shoes
nike cortez
vanvan cleef and arpels
supreme clothing
vans shoes
basketball shoes
ReplyDeletechristian louboutin outlet
jordan pas cher
ray ban
ugg boots
nfl jerseys
links of london
dolce and gabbana
ugg for men
nike outlet
20189.11chenjinbei
new balance
ReplyDeletepandora
kids jordans
nike blazer pas cher
uggs outlet
dak prescott jersey
jordan shoes
nike roshe run
basket nike
mont blanc
2018.10.17chenlixiang
The 144th Kentucky Derby happens on Saturday,Breeders Cup 2018 Live Stream May 5 and, as ever, the Run for the Roses guarantees to be the most elating race on the donning logbook.
ReplyDeleteThe Derby is the principal leg of the Triple Crown and is kept running by three-year-old pure bloods at Churchill Downs in Louisville, Kentucky.
"I have run second in the Caulfield Cup on Rising Romance (2014) and third on Dear Demi (2013) and I have ridden second in Melbourne Cup on Fiorente … I think he (Yucatan) is predominant," McDonald said. Melbourne Cup 2018
ReplyDelete"The Herbert Power run was an extraordinary trial of stamina and he demonstrated he has an incredible turn of foot, he put six lengths on a field inside 100m.
"It was basically stunning and he was simply so wrecking in the manner in which he won."
Wow i just impressed by this blog. Awesome idea you gave us. I want to do the same thing which you did. I think i can do it. Amazing LED Light Box
ReplyDeleteJust pure brilliance from you here. I have never expected something less than this from you and you have not disappointed me at all. I suppose you will keep the quality work going on. https://krmlight.com/8-ft-led-bulbs/
ReplyDeleteVery nice article, I enjoyed reading your post, very nice share, I want to twit this to my followers. Thanks!. Austin Aerial Videography
ReplyDeleteI thank you for the information and articles you provided
ReplyDeletecool, please guidance so that I can create a blog like yours
ReplyDeletea bathing ape
ReplyDeletesupreme clothing
stephen curry shoes
jordan retro
golden goose
hermes birkin bag
supreme outlet
kobe 11
supreme outlet
jordan shoes
thank you for the information provided, we are waiting for the next info
ReplyDeleteTamil Nadu SCERT Official Website Ready to Upload Latest Edition TN new 11th Class Textbooks for Various TN DGE HSC Textbook Subject Pdf Format, Textbooks Published by the Tamil Nadu Government School Education Department have been uploaded on TNSCERT website
ReplyDeletejoy replica bags review Recommended Reading d7p57e7q10 replica bags philippines greenhills replica bags australia fake hermes c6q32o5w40 replica bags reddit replica bags seoul gucci replica m9n44x2u98 7a replica bags philippines
ReplyDeleteTN Board 9th Model Paper 2023,
ReplyDeleteTamil Nadu Board Class 9th English Paper 2, 9th First Term Question Paper 2023, 9th Social Question Paper 2023, 9th English Question Paper 2023, TN Board 9th Exam Last Year Question Paper 2023, TN Board 9th Model Paper 2023 TN Board 9th Model Paper 2023, SA, FA Exam. TN 9th Model Paper 2023, Term 1 & 2 9th Model Question Paper 2023, 9th Tamil Question Paper 2023, Pdf 9th Question Paper 2023, in Tamil Nadu 9th English Question Paper 2023,