This post is Part 2 of a series of posts regarding redecorating my guest room. The previous post can be read
here.
Part 2: DIY Ikea Hack Rykene Headboard
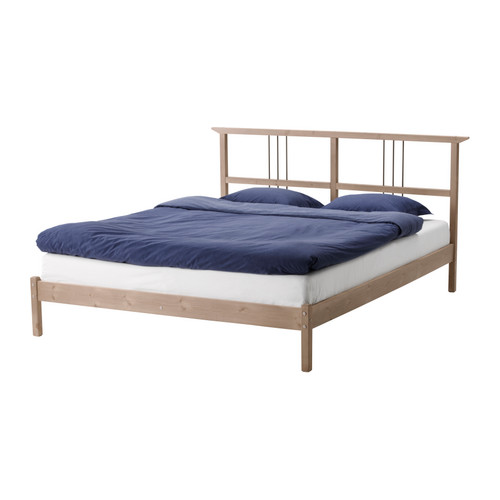
The next step in my project is to beautify the Rykene bed frame from Ikea, which I purchased from Craigslist a year ago for around $20 or $40. My inspiration is from the
Ana-White Blog. She has several headboard designs that look simple to build but beautiful to the eye. I'm following a similar design approach as the
Hailey Planked Headboard. The difference is I already have a pretty sturdy frame that has a framed headboard. The goal is to take the Ikea bed and make it look like the Hailey bed.
|
Ikea Rykene Bed Frame
(image courtesy of ikea.com)
|
Hailey Plank Headboard
(image courtesy of ana-white.com)
|
Since I already had a headboard, I did not want to add bulk in front of the headboard. Instead of using 1x6 planks per the Hailey headboard plans, I purchased 3.5" wide beadboard from Home Depot. The beadboard is a paneling for walls that consist of 1/8" thick, tongue and groove planks. This means that the ends slip into each other for a tight fit. They also have a v edge to distinguish the boards from each other, accentuating the planked look. The beadboard I picked up was called "knotty pine" and came with 6 boards 8-feet long. This would give me all the boards I needed, plus some remnants that I might use for another piece to match.
Construction Process
Materials List:
- 1 pkg of Beadboard (8-feet long, 3.5" wide, 1/8" thick) for $18
- 13.25 ft of lattice (1/4" by 1-3/8") $9 - molding would be more similar to the Hailey Plank Headboard. Not sure what I was thinking, but I decided to get the lattice which I've seen used for the Rast 3 Drawer hack. I think I am aiming for a uniform look between the two pieces. We will see how it goes.
- Wood Glue - 8 oz bottle of Elmers wood glue for $3
- Wood filler - 1/4 pint tub of Elmers wood filler for $3.30 - I wished I had bought twice this much. You'll see why below.
- Box of 1" long nails for $2.40
- 120 grit sandpaper for $1.00 - I forgot to grab some at this stage of the project. I would have liked to sand or file the cut edges during the construction phase. Of course, I picked some later for sanding the wood filler.
Tool List:
- Hammer - I already owned two hammers. One is, ironically, from an Ikea tool kit.
- Saw - I bought a 15" miter saw for $10. Nothing fancy required since all I need to do is cut the beadboard and molding. Since it is a small cut, this worked.
- Nail Punch - I had forgotten that I wanted a nail punch and ended up not getting one at first. The clerk at home depot even asked me if I had one or if I needed one. The idea with the nail punch is that you get the nail to go below the surface of the wood so that you can fill in the hole with wood filler. The clerk suggested an alternative to the punch is to get a larger sized nail and use it to apply additional hammer strokes to the nail. I later picked one up for $6, but I think the one I picked up was too small. It didn't work well with my nails and since I was painting it, I just didn't bother with trying to conceal my nails.
- 2 or more clamps - I bought 2 spring-loaded clamps for $3 each. I later discovered that these clamps were too small and ended up not using them at this time.
- Wood File - I bought a wood file for $13. I didn't pick one up at first, but when I started working on the lattice frame I remembered from wood shop back in high school that this was a much-needed tool for wood working.
Construction Steps
I first took my bed apart and brought it downstairs to my parking spot in the apartment garage (yes! I am an apartment dweller that is building something!). I had parked my car on the street for the day. I then assembled the bed in my parking spot.
 |
| Parking Garage Bed |
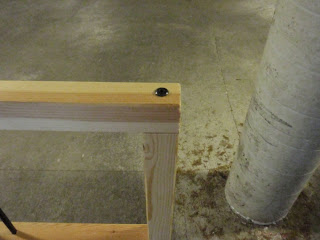
The very first thing I did to beautify this frame... I cut off the wings! Those wings look so stupid to me. It felt good to start this way. You can see on the picture on the left that I used a pencil and ruler to give myself a guideline. When you line up your saw, you want the guideline to be on the edge of the saw. You will be sawing next to the guideline, not on top of. The saw is going to chew up a swath of wood, so if you cut on top of the line, you will end up with a shorter piece than you intended.
 |
| Wings ***Before*** |
|
 |
| Wings ***After*** |
|
I then measured the beadboard in lengths matching the width of the headboard frame. I used a ruler and pencil to make guidelines. My guest bed is a full size bed that is 55.5" wide and has a 26" tall headboard. I only had 6 boards and really needed 7, so I took two of the remnants and cut them to 27.75". The very bottom board will be the two put together. Since it will be covered by the mattress it won't by visible. I used a pencil to mark a guideline on the beadboard. Before cutting my first beadboard, I used the clamps and attached the beadboard to the top of the frame. I discovered two things by doing so. One, my spring-loaded clamps were not large enough and ended up denting the beadboard. Two, the very first beadboard I picked up had missing knots! I had to remeasure the beadboard from the opposite direction so that the remnant would have the holes. I checked each beadboard, but did not find any missing knots. I made sure to choose the better side of the beadboard for the headboard end.
 |
| The first beadboard I measured ended up having missing knots with holes that went all the way through the plank. Not a great picture, but I'm sure you get the idea. |
Using the bed frame as a saw horse wasn't the most ideal situation, but it worked. Right off the bat I recognized a problem with my set up. Since I didn't have both ends propped up, or have someone to help me catch the cut piece, I found the beadboard tended to split and break once it was almost completely cut. I ended up putting my elbow on the left side of the saw and hold the remnant end with my left hand with my arm over the top of the saw. Wasn't the most comfortable position, but again, it worked. Remember that you want to line the saw up with the edge next to your line, NOT on top of it. The saw cuts up maybe 1/32" of wood, so to have the right length you want to cut on the remnant side of the line. Better to end up a slightly longer board than too short as you will end up filing/sanding the board down.
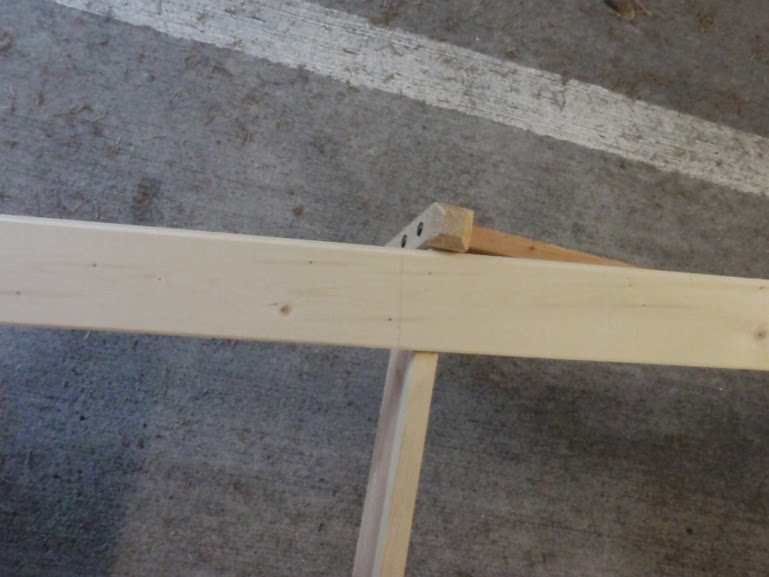 |
| I used the bed frame as a sawhorse. |
I did not cut the lattice at this time as I wanted to double measure the height of the headboard once the beadboards were attached. The width was easy, but I just wanted to be doubly sure with the height before cutting. I later regretted this decision as I didn't want to set up the bed again while the glue for the beadboards were drying, but I really did want to double-check the height of the headboard. Before I took the bed apart (probably between sawing boards after coming up with this), I marked with a pencil the top of where the sideboard meets the headboard part of the frame. You will see later why I did this. Sawing the beadboard probably took the most amount of time. The gluing and nailing took hardly any time at all. After all the beadboard was cut, I took apart the frame, put a tarp down in my parking spot (to prevent dirtying up the frame) and laid down my headboard. I arranged the planks in the order I wanted them in, with the two 27.75" planks on the bottom. I then started the process of gluing and nailing the beadboard to the Rykene headboard frame. I applied woodglue to the surface to receive the beadboard, starting at the top. Set the beadboard down with the male side of the tongue and grove up. I squared it up with the frame by using a scrap piece of beadboard and holding it to the top of the frame and pushing the bead board up to be flush with the frame.
 |
| Arranged the beadboard on the headboard. You can see the scrap piece of beadboard to the right which I used to help make my beadboard planks flush with my headboard. Also note that the two 27.75" planks are the bottom board. |
I then nailed the beadboard to the frame, doing so one board at a time and making sure each board is flush with the frame. You will want to be careful with where you put your nails as you will want to avoid the hardware for the frame. For the first beadboard, it doesn't matter where or how many nails you use along the top, but for subsequent boards you will
not want to nail the middle post. You will simply apply the wood glue and nail the outer posts only. This is because you will want to nail where the molding/lattice will go to conceal the nails. If you really wanted to nail the middle post, you could use a nail punch to sink the nail down and then apply wood filler, but I chose not to.
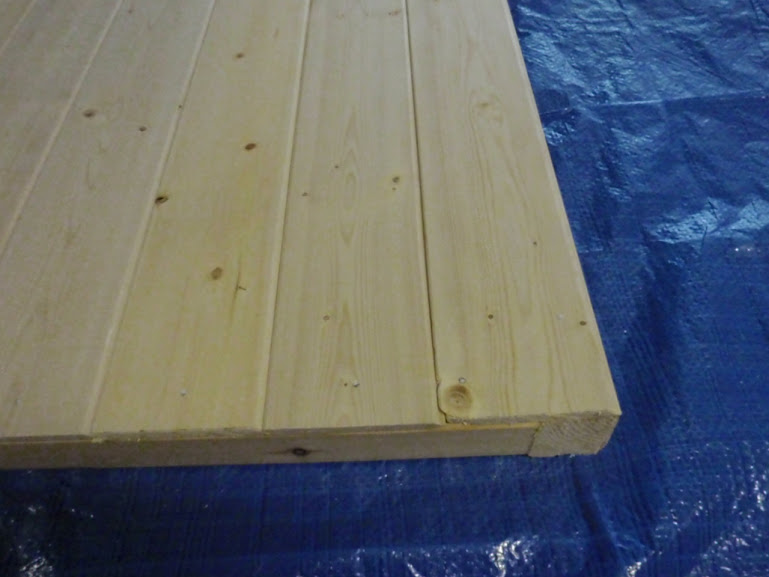 |
| Nailing down the beadboard. |
The nails are not for structural purposes. They are simply there to keep the board in place while the glue dries. I ended up putting two nails on both ends of the top and bottom beadboards. I also nailed the top beadboard at the 1/3 mark. For this first beadboard, you have to pay attention to where your bolts are for the headboard frame and the poles in the middle of the frame. I used a single nail on either end for the middle beadboards. The tongue-and-groove helps to keep everything together nicely. The last board to be attached was made out of the two remnants and spans only half the frame each. This board you will want to nail to the center post, or keep it clamped until it dries. I elected to go ahead and nail it down I should have used a nail punch or a larger nail to sink the nail down, but skipped this step as I forgot to buy a nail punch and didn't want to look for larger nails. This board will typically be behind the mattress, so you really won't ever notice that it is two pieces of beadboard.
 |
| The bottom beadboard is made from two 27.75" planks and are nailed to the center post. The crack will be filled with wood filler. |
I almost forgot to mention this. Before nailing the beadboard planks down, I noted that the bottom beadboard was above the line I had marked, which indicated the top of where the side board meets the headboard. I forgot to take a picture of this before nailing, but here it is.
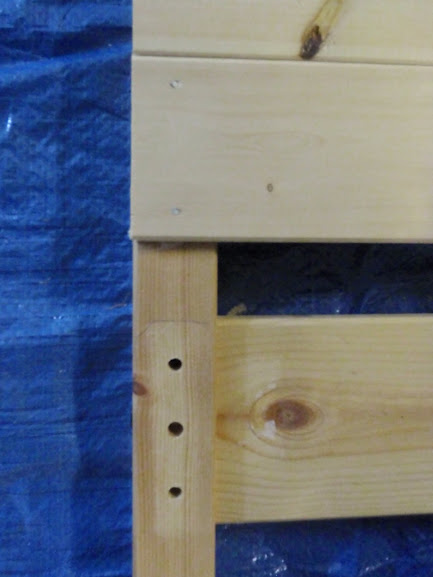 |
| Double check that your bottom plank is above where the side boards meet the headboard. I did this by drawing a line where the two boards meet before taking my bed apart. |
At this point, I was ready for a break. I had lost my bed frame as a saw horse and wanted to let the wood glue dry before setting the bed frame back up. I let it sit overnight. This part of construction took roughly 4 hours, however I was taking more time to take pictures and really think about each step and double-check that I was doing it right. This 4 hours also included prep work (taking the bed apart, taking it downstairs, etc).
 |
| Left everything to dry and took the rest of the day off. |
The next day I got started on the molding/lattice. The top molding is the width of your bed (again, for me it was 55.5" for a full size Rykene) and the two side molding is the height of the headboard (for me it was 24.75"). You will need to cut the corners at a 45 degree angle. The best way to do this is to use a miter saw jig, but I didn't have one and didn't want to buy or build one. In order to make this cut, I measured the width of the lattice and used this to measure out the length of where my cut needs to end. I then drew a line connecting the dots. I repeated this cut for both ends of the top molding/lattice and the top end of the side molding/lattice.
 |
| Measure the width of the lattice. This is the same measurement that needs to be measured length wise from the end. Then connect the measured width of lattice to the corner. |
I set up the bed frame again so that I could use it as a saw horse. This also gave me an opportunity to admire my headboard so far. I almost thought of stopping here. It looked really nice! But I decided to press on and do the lattice framing.
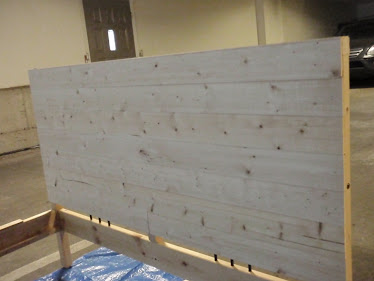 |
| Headboard before lattice. |
After cutting the lattice, I took the bed apart again and laid the frame down on my tarp. I lined up the cut lattice and realized I really needed a wood file to get the ends more snuggly. I ran out and bought a wood file, sand paper and a nail punch at this time. I came back and filed down the two spots where I cut off the wings and then filed down the cut edges of the lattice. A wood file is a much-needed tool for wood working. It really gets your cut edges smooth. I wished I had purchased it earlier. I would have cut my planks a little long and then filed them flush with the frame. I applied glue the edges of the frame and laid my lattice down. I had two options here. I could have used clamps to hold down the lattice or use cans of soup to weigh it down, but I didn't want to buy more clamps and I didn't have enough canned food. I ended up using nails. I bought a nail punch and tried to punch the nail below the surface of the wood, but it really didn't turn out well. I think it was a combination of things. The nail punch head turned out to be smaller than the head of the nail. Perhaps I also didn't hit it hard enough? But the nail punch kept moving off my nail head every time I was hitting it. I should have bought the self aligning punch, but I was being cheap. Oh, well. The whole point of doing this on the guest bedroom was to practice for the master bedroom.
 |
| Nailed down lattice corner. |
After nailing everything down and letting the glue dry, I applied wood filler to all the cracks, including the seam between the lattice's at the corners and the seam between the two bottom planks. I also decided to apply wood filler in the crack between the lattice and the Ikea frame at the top of the headboard. This is where the tongue and grove planks were not flush with the rest of the piece. After doing this a couple of times, I regretted not having more wood filler. I would have loved to also apply wood filler to the sides of the headboard to fill in additional cracks. The wood filler is then sanded to be flush with the wood. It sands really easy and clean. Unfortunately I only took pictures of the wood filler prior to being sanded.
 |
| Used wood filler to fill in all the cracks, including the top frame pictured. This is before the wood filler is sanded. |
The construction process took 6 hours total, not including shopping. I needed to let the wood filler dry. I then ran out and bought primer, paint and painting supplies. I should have bought everything in one go, but I was being timid and overwhelmed in the hardware store and decided to do multiple shorter purchases.
Painting Process
Materials List:
- Paint - I used 1 qt of Behr Semi-Gloss Blue primer/paint combo for $16
- Paint Brushes - I used one 3 inch and one 1 inch foam brushes for $0.90 and $0.60
- Foam roller - I used one 4 inch foam roller for $5
- Mini roller tray for $2
- Mask for $9
I first sanded the wood filler really good and then roughed up the rest of the frame. We had a surplus of brown paper sacks that needed to be recycled, so I cut a few of them up and laid them out in my parking spot. I then assembled the bed so that I could paint the majority of the bed. The primer paint combo went on smooth and quick. I used the roller to do longer stretches, then the brushes to do more detailed work. I didn't want to paint it shut, so I painted around the hardware and seams where the ends join the sides. The paint says it dries within 1 hour and can have an additional coat in 2 hours. I had other things to do, so it was left sitting for more than a day.
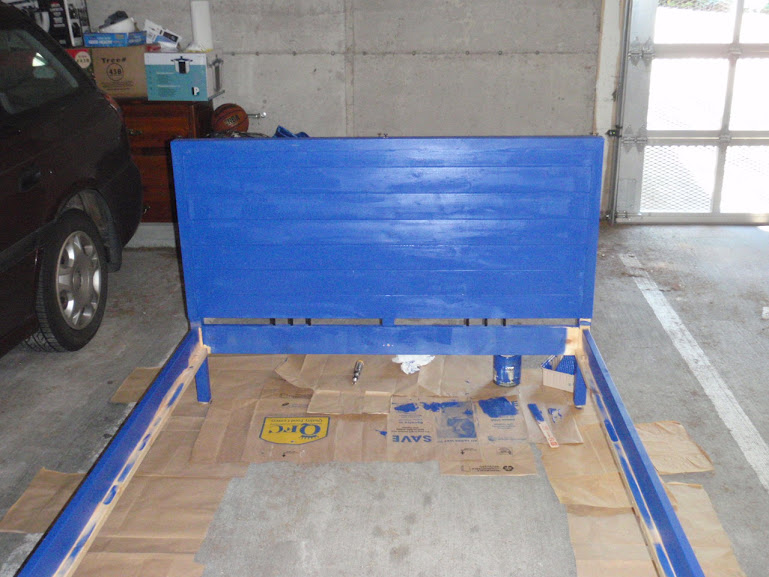 |
| First Coat. Notice that I didn't paint around the areas where the side boards meet the end boards. I didn't want to paint it shut. I also didn't bother painting some of the insides and the back. |
I applied my second coating and let it dry for two hours. I then took the bed apart and painted around the edges and hardware that I had previously skipped. Let it dry for two hours. Added some touch up paint. I let it dry for 5 days before setting up the bed. Here is the bed all set up!
 |
| Picture of the bed frame set up. I did not paint parts that will not be visible once the mattress is on. |
|
 |
| Close up of the frame with the bed all set up! |
|
 |
| Doesn't it look good? |
|
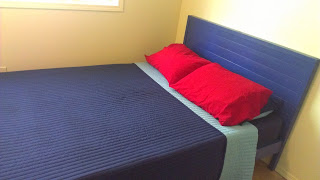 |
| I like it! |
|
Lessons Learned
The main point of starting with the guest bedroom was to really figure out how this was going to come together and learn along the way. My plan is to next tackle the master bedroom. I think for the master bedroom I might buy a frame without a headboard and then make a headboard based off of the
Ana White blog. I haven't decided yet. When we move into a house, I want to set up my own woodworking studio and make a full bed and side tables for the master bedroom. Until that time though, it is much easier to just make the headboards. Here are some lessons learned:
- Wood file - If I had a wood file on hand from the beginning, I would have cut my planks a little long and filed them flush with the rest of the frame.
- Side and top framing - I think a way to have made this better looking would have been to apply a side frame on the sides and top to hide the plank edges. I would have needed to shimmy the side and top framing up above the bolts holding the frame together. I could have then overlapped the side framing with the front framing.
- Wood filler - If I did it all again, I would have done the side/top framing discussed above or the wood filing above that. If I had just picked up a larger tub of wood filler, I would have applied it down the sides of the frame to really fill every crack visible. Since the plan all along was to paint, this would have been suitable. Alas, I ran out of filler and was running out of time to get it painted.
- Back panel - I would have liked to conceal the back with a sheet of plywood. I could have done this at any time, but I was running out of time and really wanted to get it painted in time to really dry before setting up the guestroom for my guest.
- Don't work on a deadline! It's too stressful. I thought I had a good amount of time, but after buying the materials I got sick and had two weekends wasted. :(
The final thing I would have done differently: create a taller headboard. Check out how blogger from
Pretty City Things extended the headboard for her Ikea frame.
 |
| How Pretty City Things extended her headboard on an Ikea frame. |
Before and After Pictures
Here are some before and after pictures. Don't forget to also check out my
Google+ album to see more pictures of the construction process and the bed all set up.
Total Costs and Time
I spent $20 or $40 on the bed frame, $35 on construction materials and $34 on paint and painting supplies for a total of roughly $100. I had remnants of the bead board, plenty more nails and glue. I had perhaps 1/3 of the paint left over, which I plan on using for a matching project. I also washed out the brushes and rollers so that they can be used again. I also spent $35 on tools, but these are things I can use on later projects and did not include them in the total price. Not bad, huh?
How do you like my Ikea hacked Rykene headboard? Are you considering making your own headboard or bed frame? Tell us about your project!
Linking to: Pinworthy Projects Party | A Pinteresting Party | Friday Redouxs | Pin Me | Saturday Night Special | Best of 2012 Party | The Best of 2012 Pinfest | Freedom Fridays | Empty Your Archive | Get Your DIY On




It turned out great! what a good idea to use the frame you already had!
ReplyDeleteThank you!
ReplyDeleteWow! I'm very impressed with how this turned out and how handy you are.
ReplyDeleteThank you! I've been wanting to get into furniture building ever since I stumbled upon Ana White's blog. I took a woodworking class in high school and built a kayak. Ever since that class, I have wanted to do more woodworking but thought I needed lots of tools and a house for a garage to do it. I discovered the Ikea Hackers and thought that I should tackle a smaller project in my parking spot at the apartment. I am pretty proud of how it turned out and can't wait for my next project. :D
ReplyDeleteYou did an outstanding job on this!
ReplyDeleteThank you!!! :D
ReplyDeleteGreat job - very impressed, Alice x
ReplyDeleteThank you! I am very happy with it. :)
DeleteAmen to not working in a deadline! Isn't that always the way, though? This is a fantastic update! You really gave it a whole new look! Thanks for helping to make week one of our Get Your DIY on Fall Link Party a success! Next week's theme is fall wreaths...I hope you'll join us again this Sunday! :)
ReplyDeleteThanks! It's so true about deadlines. How come I always plan to do a project with a deadline? I did it again in trying to craft something for the fiance's birthday... so didn't work out! Haha! Thanks for hosting!
DeleteI am totally amazed at your masterful woodworking skills! Wow! AND you did it all in a parking space. That definitely deserves some sort of medal or something! Thank you so much for linking up at Get Your DIY On! Hope you're having a great week, friend!
ReplyDelete~Abby =)
Thanks, Abby! It turned out pretty good for a parking spot project with minimal hand tools. Have you seen the Ana White blog? I am totally smitten and want to do my own carpentry. Awwww, one more reason why I can't wait to own a house! :)
DeleteThanks for dropping by, friend! Hugs!
I applied my second coating and let it dry for two hours. I then took the bed apart and painted around the edges and hardware that I had previously skipped. Let it dry for two hours. Added some touch up paint. I let it dry for 5 days before setting up the bed. Here is the bed all set up!
ReplyDeleteslipcovered furniture
starlyf sofa cover
page m7t97h0r31 bags replica gucci replica bags koh samui replica goyard bags replica gucci handbags u2l03j4c26 replica kipling bags replica bags los angeles go right here j5l48n4m68 replica bags joy
ReplyDelete